Time for a new project - let's build a turntable!
Alright, let's start with the basics. What do I need? I've searched everywhere and nowhere, and these are the used components:
- Two speakers
- Transformator (230V to 12V)
- Quite some cables
- Wood for the housing (I used birch and fire)
- Mounting materials (wood glue / screws / nuts and bolts)
- control knobs
- if you want/need: 6.35 to 3.5 mm convertor jack
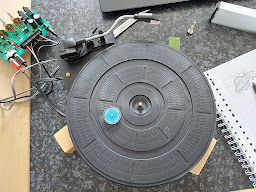
- turntable plateau (only some components were connected..)
- amplifier, I chose for not a mono amp, but a stereo. It gives a different sound, more 'real' and warmer
- (optional) on/off switch
- (optional) anti-static slipmat
- (optional) isolation feet mats
- (optional) turntable adapter
- (optional) 2 gram shell weight
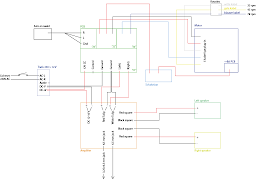
First I wanted to make sure that all the electric components work. The scheme I made and used is as followed:
(Watch out! Most pickups do not have a 'control' plug like this one. I had to test a lot of possibilities to get that connection right and working. If I didn't use it, the plateau stopped every now and then.)
Time to start soldering!
Yes, I want it all neat. Let's measure the level - is it completely horizontal?
So far, yes it is. I don't know yet how it will be after assembling everything together, but we'll see.
Before I am going to saw all pieces of wood, I want the top piece to be done. It'll be quite some work, because of all the weird shapes and holes, but it has to fit neatly. I started by drawing on my computer, getting the outlines of the plateau in the right sizes. Took some drilling and sawing and sanding and more sawing and more sanding and so on. But it'll be worth it.
Wood! Wood everywhere!
Tip: before you buy wood, check if it is straight. I bought some that had a concave - and no way that that is useful. So I went back, and bought new planks that had no concave.
Aaaalright. Time for new wood. Everything is sawn in the right size. Quite some pieces of wood, but hey that is exactly what I need.
Now it is time to get some work done. Like, slowly getting some results.
With all these pieces of wood, I decided it was time to build them, just to see how it would look. So I stapled the pieces on top of each other, and it actually starts to look way better.
I have thought about making this pickup for quite some time, and knew exactly how I wanted it to be, no matter how much time and effort has to be taken. The top plate with the plateau on it has to fall halfway in the sides of the wood, so I has to make that.
What a work.. But I continue anyway. I knew it would be quite some work.
But no, I am by far not ready for the actual build. Let's start with fitting the amplifier.
I measured the sizes, distances, and checked them again. Drew them on the wood for correct placement, checked both again, and started drilling. Different sizes of the used drill, and every time a double check. It just has to be the right size.
But no, after making these holes, it didn't fit correctly. Not yet. The holes were in the right place tho. But the bottom of the PCB had to be ~5 mm deep into the front plate. So I fixed that, and it did fit better. But not exactly how I wanted it.
So let's continue - what's the next problem that needs to be fixed?
Alright, the thread from the control knobs is a bit bigger than the outside - I could have known. Anyway, lets make the already drilled holes bigger until halfway into the wood.
It fits exactly the way I want it. The plug-ins are (if there's no 6.35 to 3.5 mm converter plugged in) exactly on the same level as the front of the wood.

The cables on the back! I wanted it subtile, and the inside of the pickup should not be visible. I drilled some holes on the exact diameter of the cables (speakers and the power cable). After that, I widened them just a little bit, and the cabled now fit perfectly fine.
Time for the bottom. I wanted to use isolation feet mats. They seem silver, but on the inside they are plastic and black. They've got a 5 mm diameter hole in them for attaching. Measured how I wanted them and how much space I had, checked with the placement of the amplifier, then moved the isolation feet a little and drew the placement on the wood.
Drilling the holed, attaching the isolation feet with nuts and bolts, and it's done. Barely took any time and work, but I like this detail, even if it is not neccessary to get the turntable working.
Let's check again - how will it look altogether? Will it still fit? (of course it will, I checked everything at least twice)
And now it is time to assembly the whole thing!
And time for new changes.
Poly carbonate for a clear cover. I really love this.
Does it fit? Yes, of course it does. I had to be careful with the used glue, it's a special one for poly carbonate and if you don't watch out enough you will see drips on your work.
Alright, I wanted to make the housing shorter because I found it too large. Sawing, cutting, sanding and some more work and it was done.
The almost-finished result so far!
Glue, glue, glue.. And glue clamps. I want it to fit well and tight.
Adding a finishing layer on top of the wooden parts!
To prevent resonance, I added demping foil in the speakers.
Holy sh*t, I'm already finished!
Well, this was a fun project. Even though the soldering had to be changed quite a lot and the wood had to be re-done because of concave in the old pieces, it was quite nice. I learnt new things and expanded skills.
Total amount of costs
Curious about the payments I made? Or do you (too) want to build a pickup, and are looking at the possible amount of money you need? This is a quite deatilled sum of my payments.
! Things can go wrong. You might need to buy spare parts!
DIY shop:
- Wood (fire, birch) €31.98
- Acoustic demping foil €14.99
- Wood finish coating €8.95
- Isolation feet €2.45
Electronics:
- 2 Speakers €15.20 (total)
- Amplifier €8.57
- On/off switch €0.93
- Transformator €6.92
- Pickup plateau €14.85
- Cable end pins €3.08
- Control knobs €2.52
- 6.35>3.5 mm jacks €1.63
Total: € 112.07
Excluded: machinery, sanding paper, cables; because I had 'free' access to it.
Also, the cover was made out of a resting piece of PolyCarbonate, so I did not have to pay for it.


Comments
Post a Comment